Rust 学习笔记

#1 基础语法学习

#1.1 print

{:?} 可进行有格式的打印,是 Debug 宏的实现
#[derive(Debug)] 如要打印结构体数据 需要添加这个’宏定义’

#1.2 display

如果系统的 print 无法满足需求, 可自己实现 display 进行格式化打印。

1
2
3
4
5
6
7
8
9
10
11
12
13
14
15
16
17
18
19
20
21
22
23
24
25
26
27
28
29
30
31
use std::fmt; // Import the `fmt` module.

// Define a structure named `List` containing a `Vec`.
struct List(Vec<i32>);

impl fmt::Display for List {
fn fmt(&self, f: &mut fmt::Formatter) -> fmt::Result {
// Extract the value using tuple indexing,
// and create a reference to `vec`.
let vec = &self.0;

write!(f, "[")?;

// Iterate over `v` in `vec` while enumerating the iteration
// count in `count`.
for (count, v) in vec.iter().enumerate() {
// For every element except the first, add a comma.
// Use the ? operator to return on errors.
if count != 0 { write!(f, ", ")?; }
write!(f, "{}: {}", count, v)?;
}

// Close the opened bracket and return a fmt::Result value.
write!(f, "]")
}
}

fn main() {
let v = List(vec![1, 2, 3]);
println!("{}", v);
}

#1.3 trait

trait 实际就是接口的意思。trait 告诉 Rust 编译器某个特定类型拥有可能与其他类型共享的功能。可以通过 trait 以一种抽象的方式定义共享的行为。

1
2
3
4
5
6
7
8
9
10
11
12
13
14
15
16
17
18
19
20
21
22
23
24
25
26
27
28
29
30
31
32
33
34
35
36
37
38
39
40
41
42
43
44
45
46
47
48
49
50
51
52
53
54
55
56
57
58
59
60
61
62
63
64
65
66
67
68
69
70
71
72
// 声明一个 summary 的 trait, 并且有默认的实现
pub trait Summary {
fn summarize(&self) -> String {
String::from("(read more...)")
}
}


pub struct NewsArticle {
pub headline: String,
pub location: String,
pub author: String,
pub content: String,
}

// 对 NewsArticle 的 Summary 实现
impl Summary for NewsArticle {
fn summarize(&self) -> String {
format!("{}, by {} ({})", self.headline, self.author, self.location)
}
}

pub struct Tweet {
pub username: String,
pub content: String,
pub reply: bool,
pub retweet: bool,
}

// 对 Tweet 的 Summary 实现
impl Summary for Tweet {
fn summarize(&self) -> String {
format!("{}: {}", self.username, self.content)
}
}

pub struct NewComment {
pub author: String,
}

// 不实现自己的 Summary,使用默认实现
impl Summary for NewComment {}

// 使用 trait 作为参数,参数对象必须有 trait 的实现
// 可以传递任何 NewsArticle 或 Tweet 的实例来调用 notify。
// 任何用其它如 String 或 i32 的类型调用该函数的代码都不能编译,因为它们没有实现 Summary。

pub fn notify(item: impl Summary) {
println!("Breaking news {}",item.summarize());
}


fn main() {
let tweet = Tweet {
username: String::from("horse_ebooks"),
content: String::from("of course, as you probably already know, people"),
reply: false,
retweet: false,
};

let article = NewsArticle {
headline: String::from("hello world"),
location: String::from("beijing"),
author: String::from("matianqi"),
content: String::from("read the book")
};

println!("1 new tweet: {}", tweet.summarize());

println!("1 new article: {}",article.summarize());

}

写法1

1
2
3
pub fn notify(item: impl Summary) {
println!("Breaking news! {}", item.summarize());
}

写法2

1
2
3
pub fn notify<T: Summary>(item: T) {
println!("Breaking news! {}", item.summarize());
}

上面的 写法1写法2 具有同样的效果,写法1impl trait , 写法2trait bound

通过 + 指定多个 trait bound

1
2
3
pub fn notify(item: impl Summary + Display) {}

pub fn notify<T: Summary + Display>(item: T) {}

当有多个泛型参数,使用where 从句指定 trait bound的语法。
这里实际上是 在where 中 描述了 函数泛型参数 具有哪些trait 。表现更规整。

1
2
3
4
5
6
7
fn some_function<T: Display + Clone, U: Clone + Debug>(t: T, u: U) -> i32 {}

fn some_function<T, U>(t: T, u: U) -> i32
where T: Display + Clone,
U: Clone + Debug
{}

返回值使用 trait

1
2
3
4
5
6
7
8
fn returns_summarizable() -> impl Summary {
Tweet {
username: String::from("horse_ebooks"),
content: String::from("of course, as you probably already know, people"),
reply: false,
retweet: false,
}
}

使用 trait 求最大值

1
2
3
4
5
6
7
8
9
10
11
12
13
14
15
16
17
18
19
20
21
22
23
24
// 这里还有另外一种写法是,返回值为 `slice` 中 `T` 的 引用
fn largest<T: PartialOrd + Copy>(list: &[T]) -> T {
let mut largest = list[0];

for &item in list.iter() {
if item > largest {
largest = item;
}
}

largest
}

fn main() {
let number_list = vec![34, 50, 25, 100, 65];

let result = largest(&number_list);
println!("The largest number is {}", result);

let char_list = vec!['y', 'm', 'a', 'q'];

let result = largest(&char_list);
println!("The largest char is {}", result);
}

#1.4 函数定义

  • fn function_name(variable: String)接收了String,并拥有它。如果它不返回任何东西,那么这个变量就会在函数里面死亡。
  • fn function_name(variable: &String) 借用 String 并可以查看它
  • fn function_name(variable: &mut String)借用String,可以更改。

#2 rust优秀开源项目

#2.1 项目列表

TiKV
PingCAP公司开源的TiDB的存储引擎。(我也不知道是啥~~~)

mesalink
百度安全部,为解决OpenSSL心脏滴血等漏洞,用rust写的SSL实现。(目前好像没人维护了,Maintainer 去了google)

毕业答辩完成

今天毕业答辩通过,也算是给研究生时期画了一个句号。

不自信的讲,我是一个来自二本学校的学生,高考考过两次才考上二本,研究生又考了两次。也算是补回了小学时提前上学的时间。研究生期间,我一直在追赶我的同学,努力去补本科时期留下的坑。并且拓宽自己的认知。

值得说的是,在红帽实习期间,见识了计算机行业最顶尖的程序员,那群写开源软件的大拿,我和他们的差距还很远。首先是语言,英语是科技行业的通用语言,有良好的英语基础,才能听懂别人在说一个什么样的事情。但是听懂还不够,得领会别人的思想,才能有效的交流。我在研究生期间学习英语的最多时间是看英语论文和查英语资料。这个公司提倡分享和表达,果然是开源世界的第一商业公司。不过北京这边的职位均是测试岗位,时间长了会有点枯燥。有remote的工作,均是开源项目的贡献者。以后有机会可以去试一试。见识一下这个世界的顶级开发者。

再就是毕业论文的书写。那段时间真的是焦头烂额。论文的方方面面太多了。要兼顾论文的书写和系统的设计与实现。不过好歹最后完成并通过了答辩。

就我自己来说,做一件事情首先得看好的一面,要开始做起来,里面的坑和难处得经历一遍才能让自己涨经验和知识。所以重要的是坚持。不要有顾虑,没什么大不了的。

最后要保持身体健康,不要暴饮暴食和醉酒熬夜。

精通比特币阅读笔记

#书籍地址

中文译文
英文原版

#选段

比特币的所有权是通过数字密钥、比特币地址和数字签名来确立的。数字密钥实际上并不是存储在网络中,而是由用户生成并存储在一个文件或简单的数据库中,称为钱包。存储在用户钱包中的数字密钥完全独立于比特币协议,可由用户的钱包软件生成并管理,而无需区块链或网络连接。密钥实现了比特币的许多有趣特性,包括去中心化信任和控制、所有权认证和基于密码学证明的安全模型。

一笔比特币交易的生命周期起始于它被创建的那一刻,也就是诞生(origination)。 随后,比特币交易会被一个或者多个签名加密,这些签名标志着对该交易指向的比特币资金的使用许可。接下来,比特币交易被广播到比特币网络中。在比特币网络中,每一个节点(比特币交易参与者)验证、并将交易在网络中进行广播,直到这笔交易被网络中大多数节点接收。最终,比特币交易被一个挖矿节点验证,并被添加到区块链上一个记录着许多比特币交易的区块中。

一笔比特币交易一旦被记录到区块链上并被足够多的后续区块确认,便成为比特币总账簿的一部分,并被所有比特币交易参与者认可为有效交易。于是,被这笔交易分配到一个新所有者名下的比特币资金可以在新的交易中被使用——这使得所有权链得以延伸且再次开启一个新的比特币交易生命周期。

套接字中SO_REUSEPORT和SO_REUSEADDR

#Q

可否多个进程监听同一个端口

#A

可通过两种方式在同一个端口上监听

  • 设置 SO_REUSEPORT
  • 设置 SO_REUSEADDR

#SO_REUSEPORT

测试代码:

1
2
3
4
5
6
7
8
9
10
11
12
13
14
import socket
import os

SO_REUSEPORT = 15
s = socket.socket(socket.AF_INET, socket.SOCK_STREAM)
s.setsockopt(socket.SOL_SOCKET, socket.SO_REUSEPORT, 1)
s.bind(('', 10000))
s.listen(1)
while True:
conn, addr = s.accept()
print "Connected to %d \t addr: %s " % (os.getpid(),addr)
#data = conn.recv(1024)
conn.send('Connected to {} \n'.format(os.getpid()))
conn.close()

这个参数在 MacOS 和 Linux 上被设置后,效果是不一样的。

#在 MacOS 上的效果

  • 能无冲突的开启两个不同的进程


其中PID 23601 是第一个开启,PID 23696 是第二个开启的。

  • 使用nc去连接该端口


可以看到 只有 PID 23601 的socket 被连接
只有在kill 掉 PID 23601PID 23696 才会被连接

  • 并且可以在不同用户下运行该程序


接入顺序还是和前面的相同,先开启的进程会去接受请求,后开启的进程只有在先开启的进程结束后才能接受请求。

#在Linux上的效果

  • 与MacOS不同之处在于,Linux 会随机(可能是某种算法)选择进程去接受请求。


    这样的好处是,上层程序可以将负载均衡完全交给系统层去完成。

  • 在用不同账户去尝试运行这个程序时会报错

这符合参考文档中的说明,linux 可以让多进程重用端口,但是这些进程必须是同一个账户。显然 Mac OS 的相关机制不同。

#另外

参考文档中说 SO_REUSEPORT 是在Linux 3.9 之后加入的。
我的实验环境的内核版本为2.6

学校网关用的是 NAT 而不是 NAPT 只对 IP 地址进行了转换,端口号不变

#reference

http://blog.csdn.net/Yaokai_AssultMaster/article/details/68951150

https://stackoverflow.com/questions/14388706/socket-options-so-reuseaddr-and-so-reuseport-how-do-they-differ-do-they-mean-t

https://bg2bkk.github.io/post/SO_REUSEADDR%E5%92%8CSO_REUSEPORT/

Understanding the Linux kernel 笔记

#用户态&内核态

#解析

经常会提到 用户态, 内核态, 用户空间, 内核空间 这几个概念,但是对其理解并不深刻,只有一个感性的认识,知其然,不知其所以然。

下面这个程序是进行归并排序,数据量为5000000

当前排序操作不涉及外部存储,不存在系统调用,通过top 命令可以看到,cpu 99.7 us。

其中,第一项99.7 us(user 的缩写)就是 CPU 消耗在 User space 的时间百分比。第二项0.3 sy(system 的缩写)是消耗在 Kernel space 的时间百分比。

  • ni:niceness 的缩写,CPU 消耗在 nice 进程(低优先级)的时间百分比
  • id:idle 的缩写,CPU 消耗在闲置进程的时间百分比,这个值越低,表示 CPU 越忙
  • wa:wait 的缩写,CPU 等待外部 I/O 的时间百分比,这段时间 CPU 不能干其他事,但是也没有执行运算,这个值太高就说明外部设备有问题
  • hi:hardware interrupt 的缩写,CPU 响应硬件中断请求的时间百分比
  • si:software interrupt 的缩写,CPU 响应软件中断请求的时间百分比
  • st:stole time 的缩写,该项指标只对虚拟机有效,表示分配给当前虚拟机的 CPU 时间之中,被同一台物理机上的其他虚拟机偷走的时间百分比

以下命令生成10G文件,可以看到 wa 的值为97.9
dd if=/dev/zero of=/root/randomfile bs=1M count=10240

下面的程序,既有计算的操作也有写文件的操作,在用户空间和内核空间进行切换操作。在程序优化上可将这类操作进行分块进行,防止程序进行大量的上下文切换,可以提高性能。
具体优化方法,我还不知道~

1
2
3
4
5
6
7
for i in range(1000000):
i+1 #用户空间
fd = open("test.file","a+")
fd.write(str(i)) #内核空间
fd.write("\n") #内核空间
fd.close()
i*i #用户空间
1
2
# time python test.py
python test.py 2.24s user 4.74s system 98% cpu 7.067 total

#References

http://www.ruanyifeng.com/blog/2016/12/user_space_vs_kernel_space.html

#进程&线程

#进程与线程的主要区别

  1. 线程共享创建它的进程的地址空间,而进程有独立的地址空间
  2. 线程对所在进程中的数据段可以直接访问,子进程具有父进程的数据段副本
  3. 线程能与其它同一进程内的线程进行通信,进程间使用进程间通信手段进行通信
    • 进程间通信:
      • 管道和FIFO
      • 信号量
      • 消息
      • 共享内存区 最高效的进程通信方式,zero copy?
      • 套接字 socket
  4. 线程几乎没有开销,进程有相当大的开销
  5. 新线程很容易创建,新进程需要父进程进行复制操作
  6. 线程可以对同一进程下的其他线程进行控制,进程只能控制其子进程
  7. 对主线线程的更改(撤销,优先级更改)可能会影响进程中的其他线程,对父进程进行修改不会影响子进程。

#参考链接

https://stackoverflow.com/questions/200469/what-is-the-difference-between-a-process-and-a-thread

#第三章 进程

#进程描述符

进程描述符是task_struct类型结构体。该结构体的定义的文件位置是
/Users/matianqi/Project/Linux_Kernel/linux-2.6.11/include/linux/sched.h
具体定义:

1
2
3
4
5
6
7
8
9
10
11
12
13
14
15
16
17
18
19
20
21
22
23
24
25
26
27
28
29
30
31
32
33
34
35
36
37
38
39
40
41
42
43
44
45
46
47
48
49
50
51
52
53
54
55
56
57
58
59
60
61
62
63
64
65
66
67
68
69
70
71
72
73
74
75
76
77
78
79
80
81
82
83
84
85
86
87
88
89
90
91
92
93
94
95
96
97
98
99
100
101
102
103
104
105
106
107
108
109
110
111
112
113
114
115
116
117
118
119
120
121
122
123
124
125
126
127
128
129
130
131
132
133
134
135
136
137
138
139
140
141
142
143
144
145
146
147
148
149
150
151
152
153
154
155
156
157
158
159
160
161
struct task_struct {
volatile long state; /* -1 unrunnable, 0 runnable, >0 stopped */
struct thread_info *thread_info; /* 进程的基本信息 */
atomic_t usage;
unsigned long flags; /* per process flags, defined below */
unsigned long ptrace;

int lock_depth; /* Lock depth */

int prio, static_prio;
struct list_head run_list;
prio_array_t *array;

unsigned long sleep_avg;
unsigned long long timestamp, last_ran;
int activated;

unsigned long policy;
cpumask_t cpus_allowed;
unsigned int time_slice, first_time_slice;

#ifdef CONFIG_SCHEDSTATS
struct sched_info sched_info;
#endif

struct list_head tasks;
/*
* ptrace_list/ptrace_children forms the list of my children
* that were stolen by a ptracer.
*/
struct list_head ptrace_children;
struct list_head ptrace_list;

struct mm_struct *mm, *active_mm;

/* task state */
struct linux_binfmt *binfmt;
long exit_state;
int exit_code, exit_signal;
int pdeath_signal; /* The signal sent when the parent dies */
/* ??? */
unsigned long personality;
unsigned did_exec:1;
pid_t pid;
pid_t tgid;
/*
* pointers to (original) parent process, youngest child, younger sibling,
* older sibling, respectively. (p->father can be replaced with
* p->parent->pid)
*/
struct task_struct *real_parent; /* real parent process (when being debugged) */
struct task_struct *parent; /* parent process */
/*
* children/sibling forms the list of my children plus the
* tasks I'm ptracing.
*/
struct list_head children; /* list of my children */
struct list_head sibling; /* linkage in my parent's children list */
struct task_struct *group_leader; /* threadgroup leader */

/* PID/PID hash table linkage. */
struct pid pids[PIDTYPE_MAX];

struct completion *vfork_done; /* for vfork() */
int __user *set_child_tid; /* CLONE_CHILD_SETTID */
int __user *clear_child_tid; /* CLONE_CHILD_CLEARTID */

unsigned long rt_priority;
unsigned long it_real_value, it_real_incr;
cputime_t it_virt_value, it_virt_incr;
cputime_t it_prof_value, it_prof_incr;
struct timer_list real_timer;
cputime_t utime, stime;
unsigned long nvcsw, nivcsw; /* context switch counts */
struct timespec start_time;
/* mm fault and swap info: this can arguably be seen as either mm-specific or thread-specific */
unsigned long min_flt, maj_flt;
/* process credentials */
uid_t uid,euid,suid,fsuid;
gid_t gid,egid,sgid,fsgid;
struct group_info *group_info;
kernel_cap_t cap_effective, cap_inheritable, cap_permitted;
unsigned keep_capabilities:1;
struct user_struct *user;
#ifdef CONFIG_KEYS
struct key *session_keyring; /* keyring inherited over fork */
struct key *process_keyring; /* keyring private to this process (CLONE_THREAD) */
struct key *thread_keyring; /* keyring private to this thread */
#endif
int oomkilladj; /* OOM kill score adjustment (bit shift). */
char comm[TASK_COMM_LEN];
/* file system info */
int link_count, total_link_count;
/* ipc stuff */
struct sysv_sem sysvsem;
/* CPU-specific state of this task */
struct thread_struct thread;
/* filesystem information */
struct fs_struct *fs;
/* open file information */
struct files_struct *files;
/* namespace */
struct namespace *namespace;
/* signal handlers */
struct signal_struct *signal;
struct sighand_struct *sighand;

sigset_t blocked, real_blocked;
struct sigpending pending;

unsigned long sas_ss_sp;
size_t sas_ss_size;
int (*notifier)(void *priv);
void *notifier_data;
sigset_t *notifier_mask;

void *security;
struct audit_context *audit_context;

/* Thread group tracking */
u32 parent_exec_id;
u32 self_exec_id;
/* Protection of (de-)allocation: mm, files, fs, tty, keyrings */
spinlock_t alloc_lock;
/* Protection of proc_dentry: nesting proc_lock, dcache_lock, write_lock_irq(&tasklist_lock); */
spinlock_t proc_lock;
/* context-switch lock */
spinlock_t switch_lock;

/* journalling filesystem info */
void *journal_info;

/* VM state */
struct reclaim_state *reclaim_state;

struct dentry *proc_dentry;
struct backing_dev_info *backing_dev_info;

struct io_context *io_context;

unsigned long ptrace_message;
siginfo_t *last_siginfo; /* For ptrace use. */
/*
* current io wait handle: wait queue entry to use for io waits
* If this thread is processing aio, this points at the waitqueue
* inside the currently handled kiocb. It may be NULL (i.e. default
* to a stack based synchronous wait) if its doing sync IO.
*/
wait_queue_t *io_wait;
/* i/o counters(bytes read/written, #syscalls */
u64 rchar, wchar, syscr, syscw;
#if defined(CONFIG_BSD_PROCESS_ACCT)
u64 acct_rss_mem1; /* accumulated rss usage */
u64 acct_vm_mem1; /* accumulated virtual memory usage */
clock_t acct_stimexpd; /* clock_t-converted stime since last update */
#endif
#ifdef CONFIG_NUMA
struct mempolicy *mempolicy;
short il_next;
#endif
};

可以看到task_struct的定义有161行。

#进程状态

在该文件中有进程状态的宏定义

1
2
3
4
5
6
7
#define TASK_RUNNING		0
#define TASK_INTERRUPTIBLE 1
#define TASK_UNINTERRUPTIBLE 2
#define TASK_STOPPED 4
#define TASK_TRACED 8
#define EXIT_ZOMBIE 16
#define EXIT_DEAD 32

可以将以上的宏赋值给进程描述符的state字段,从而标示进程状态。

p->state = TASK_RUNNING

#疑问

  1. volatile long state; /* -1 unrunnable, 0 runnable, >0 stopped */ 中表示 state 的值大于0 时为stopped状态。这个stopped和 TASK_STOPPED有什么区别?

linux kernel development 阅读笔记

#第三章 进程管理

#什么是进程

Linux has a unique implementation of threads: It does not differentiate between threads and processes. To Linux, a thread is just a special kind of process.

对 linux 来说 ,thread 和 process 并没有区别。
thread 只是特殊的 process

On modern operating systems, processes provide two virtualizations: a virtualized processor and virtual memory. The virtual processor gives the process the illusion that it alone monopolizes the system, despite possibly sharing the processor among hundreds of other processes.

Chapter 4, “Process Scheduling,” discusses this virtualization.

Virtual memory lets the process allocate and manage memory as if it alone owned all the memory in the system.

Virtual memory is covered in Chapter 12, “Memory Management.”

对 process 来说, process 好像独占cpu 和 memory。

#进程描述符

#什么是进程描述符

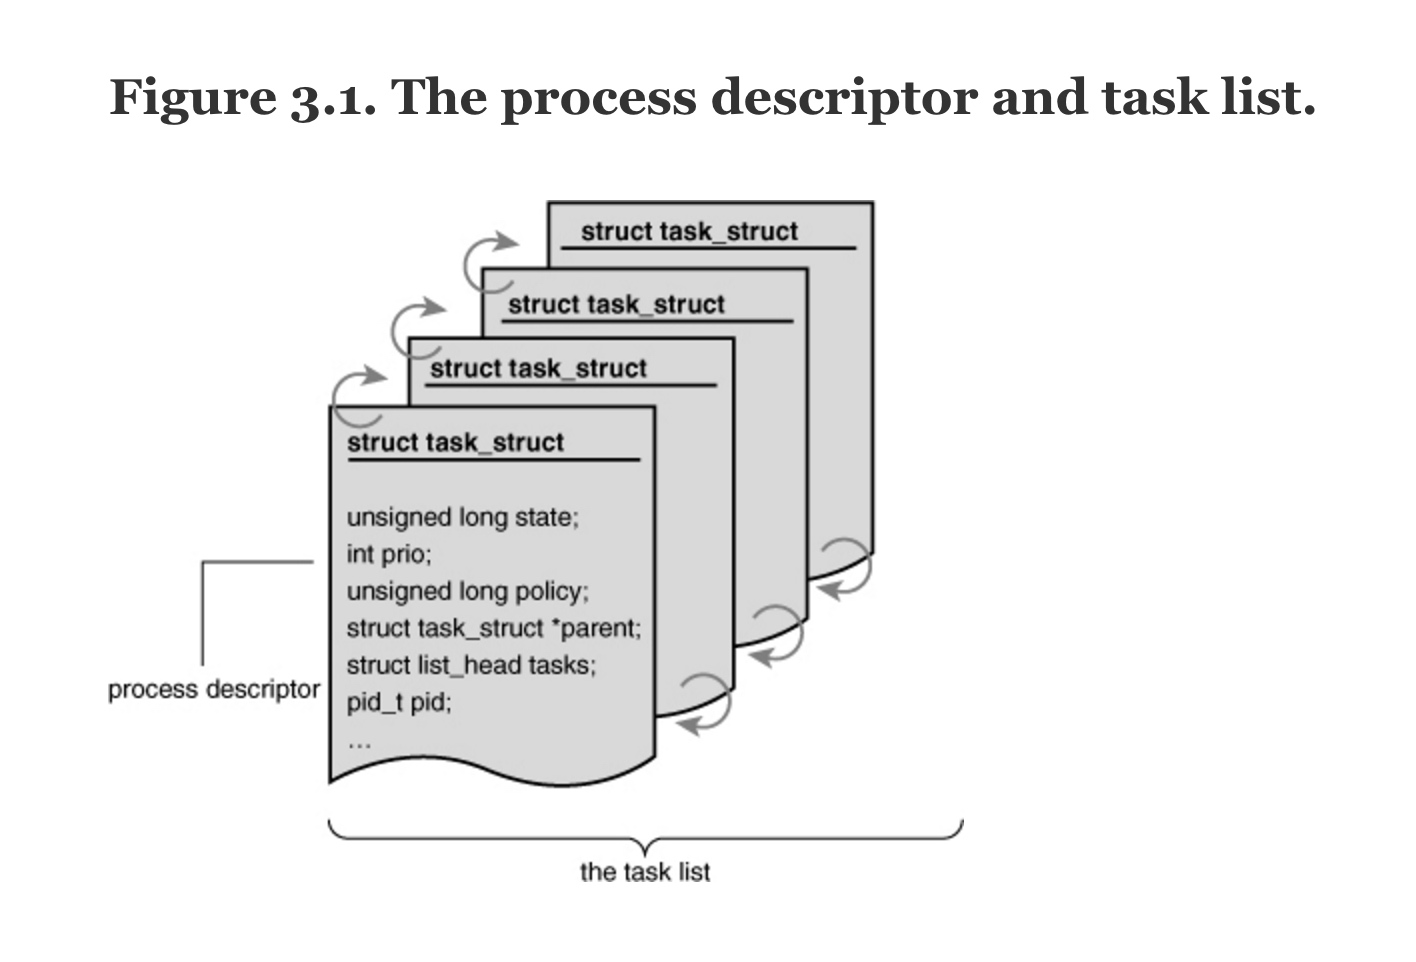
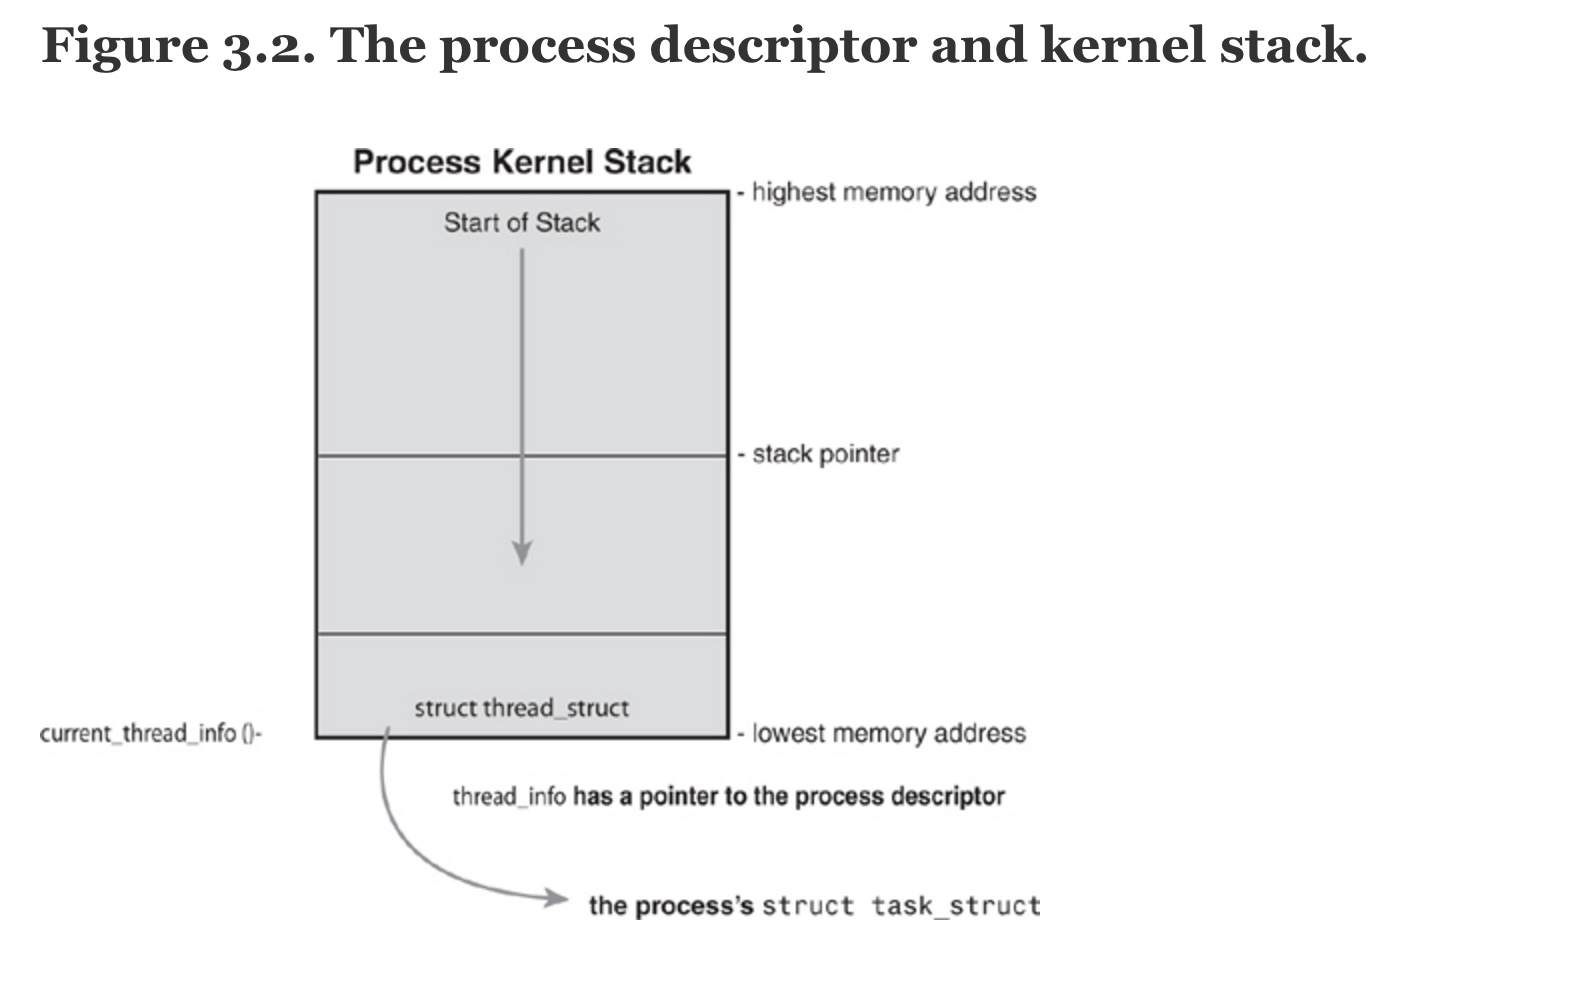
The task_struct is a relatively large data structure, at around 1.7 kilobytes on a 32-bit machine. This size, however, is quite small considering that the structure contains all the information that the kernel has and needs about a process. The process descriptor contains the data that describes the executing program—open files, the process’s address space, pending signals, the process’s state, and much more.

#进程描述符放在那里

The kernel stores the list of processes in a circular doubly linked list called the task list.

在kernel中 进程描述符存储在环形双向链表(task list)中。

进程描述符 process descriptor ,定义在 <linux/sched.h>
Understanding the Linux kernel 笔记(三) 第三章 进程 有贴出pd全部的定义
进程描述符在kernel的栈空间中所在的位置

The system identifies processes by a unique process identification value or PID.

PID 有个默认的最大值 32768

this is controlled in <linux/threads.h>

1
2
3
4
5
6
7
8
9
/*
* This controls the default maximum pid allocated to a process
*/
#define PID_MAX_DEFAULT 0x8000

/*
* A maximum of 4 million PIDs should be enough for a while:
*/
#define PID_MAX_LIMIT (sizeof(long) > 4 ? 4*1024*1024 : PID_MAX_DEFAULT)

the administrator may increase the maximum value via /proc/sys/kernel/pid_max

PID 最大值可通过改变 /proc/sys/kernel/pid_max 修改

1
2
# cat /proc/sys/kernel/pid_max
32768

x86 架构不能将 当前运行的process 的 PD 存在寄存器中,因为它的寄存器太少了,但是 ppc 架构的可以 ,ppc 架构的寄存器多。

所以还是IBM厉害,寄存器都给的这么奢侈~~

Contrast this approach with that taken by PowerPC (IBM’s modern RISC-based microprocessor), which stores the current task_struct in a register. Thus, current on PPC merely returns the value stored in the register r2. PPC can take this approach because, unlike x86, it has plenty of registers. Because accessing the process descriptor is a common and important job, the PPC kernel developers deem using a register worthy for the task.

x86 架构存储的是 thread_info <The thread_info structure is defined on x86 in <include/asm-x86_64/thread_info.h>>

1
2
3
4
5
6
7
8
9
10
11
12
struct thread_info {
struct task_struct *task;// a point to pd
/* main task structure */
struct exec_domain *exec_domain; /* execution domain */
__u32 flags; /* low level flags */
__u32 status; /* thread synchronous flags */
__u32 cpu; /* current CPU */
int preempt_count;

mm_segment_t addr_limit;
struct restart_block restart_block;
};

#进程状态

pd 结构体中的 状态变量

1
volatile long state;	/* -1 unrunnable, 0 runnable, >0 stopped */

一共5

  • TASK_RUNNING
    正在运行或在运行队列中

  • TASK_INTERRUPTIBLE
    睡眠状态

  • TASK_UNINTERRUPTIBLE
    这个状态不好理解,意思是即使有其需要的资源,他也不一定会运行

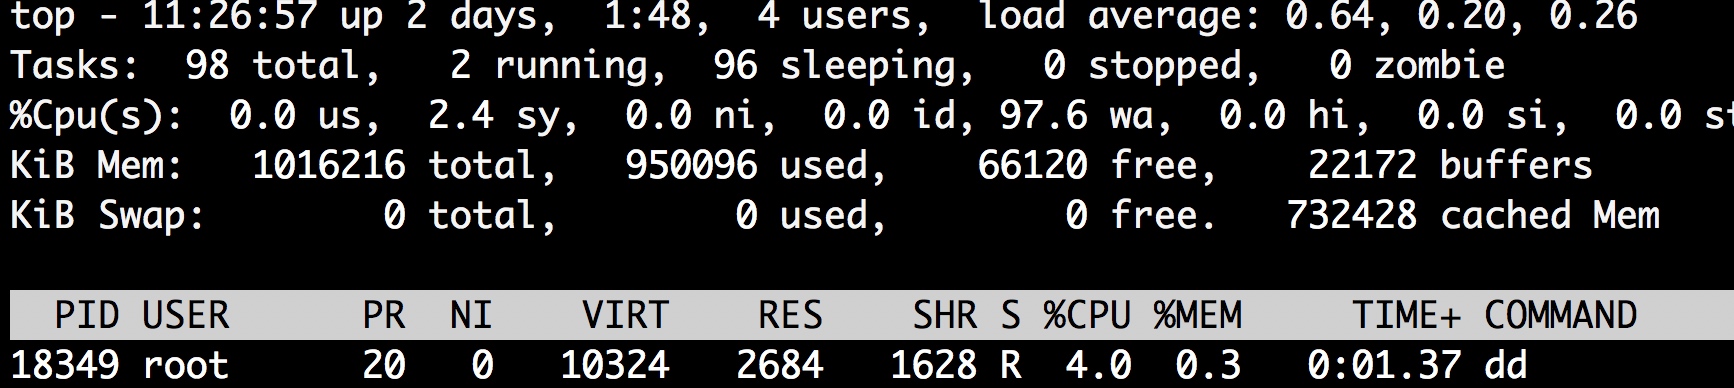
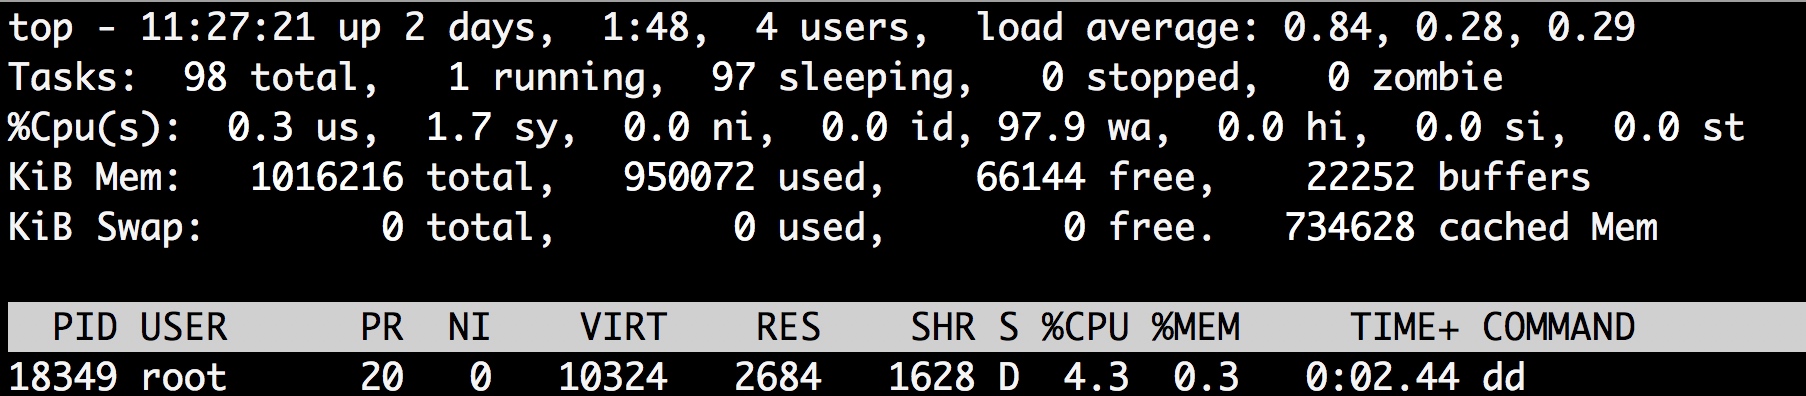
• TASK_UNINTERRUPTIBLE—This state is identical to TASK_INTERRUPTIBLE except that it does not wake up and become runnable if it receives a signal. This is used in situations where the process must wait without interruption or when the event is expected to occur quite quickly. Because the task does not respond to signals in this state, TASK_UNINTERRUPTIBLE is less often used than TASK_INTERRUPTIBLE.

This is why you have those dreaded unkillable processes with state D in ps(1). Because the task will not respond to signals, you cannot send it a SIGKILL signal. Further, even if you could terminate the task, it would not be wise because the task is supposedly in the middle of an important operation and may hold a semaphore.

  • __TASK_TRACED

  • __TASK_STOPPED

#如何改变进程状态

1
set_task_state(task, state);        /* set task 'task' to state 'state' */

在linux/sched.h 中set_task_state函数 定义为 set_mb

1
2
#define set_task_state(tsk, state_value)		\
set_mb((tsk)->state, (state_value))

set_mb在不同架构的处理器上的具体实现不一样

x86_64

include/asm-x86_64/system.h

1
#define set_mb(var, value) do { xchg(&var, value); } while (0)

ppc

include/asm-ppc/system.h

1
#define set_mb(var, value)	do { var = value; mb(); } while (0)

#进程上下文

算法学习笔记

今天开始学习算法和设计模式
主要学习资料是
视频 Hua Hua
博客 Huahua’s Tech Road

#20200418

学习了并查集,看了视频
花花酱 Disjoint-set/Union-find Forest - 刷题找工作 SP1
博客文章
视频里面主要讲了 find 和 union 两个操作。
find 即找到节点的root。 对应路径压缩。 这里面有个点是,路径压缩是在find 的过程中进行的,如果不进行find,则不进行路径压缩。并且具体实现是通过递归实现。具体实现 我不太会用语言描述,主要是对递归的理解不深。递归算法需要加强下

union 对应分枝合并,将 rank 少的合并到 rank 多的。

并查集 这个算法 在 算法(第4版) [Algorithms Fourth Edition] 这本书里面是单独的一个章节 还需要详细学习下。。

参考链接
https://www.cs.princeton.edu/courses/archive/spring13/cos423/lectures/UnionFind.pdf

#20200425

根据数据输入规模估算时间复杂度,从而大概找到对应的算法。

树状数组 (没搞懂,找别的资料看一下)

线程与进程

#20200512

#正则表达式入门

A.*A 字符串中有两个A
LLL 字符串中有连续三个L
A.*A|LLL 字符串中有两个A 或者连续的三个L
正则表达式的优势 是 可读性高

#动态规划入门


这个题目的思路是找到中间节点 如果前i的子串中间节点右边的串在字典中 ,那么前i的子串就是可分割的。
整个字符串是否可分割即 i 等于 字符串长度 时是否能找到中间节点右边的串在字典中。

这里先是在 s 前加了一个空字符。
然后构造了长度为n+1,初始值为0的数组,标记 s 前 i 长度的字符串是否可以被分割。
f[0] = 1 的意思是 s 是空字符串。

两层循环。
外层循环是整个问题的规模。即s 的长度。
内层循环是子问题,j 从 0 到 i。如果j 右边到i 的字符串在字典中,即 s[0:i]是可以被分割的。就可以跳出内层循环了。
逐步扩大求解范围,通过解决子问题,从而得到整体问题的解。

#20180718_771 Jewels and Stones

  • question

You’re given strings J representing the types of stones that are jewels, and S representing the stones you have. Each character in S is a type of stone you have. You want to know how many of the stones you have are also jewels.

The letters in J are guaranteed distinct, and all characters in J and S are letters. Letters are case sensitive, so “a” is considered a different type of stone from “A”.

Example 1:

1
2
Input: J = "aA", S = "aAAbbbb"
Output: 3

Example 2:

1
2
Input: J = "z", S = "ZZ"
Output: 0
  • solution
1
2
3
4
5
6
7
8
9
10
11
12
13
class Solution(object):
def numJewelsInStones(self, J, S):
"""
:type J: str
:type S: str
:rtype: int
"""
count = 0
for item in S:
if item in J:
count = count + 1

return count

#20180719_709 To Lower Case

  • question

Implement function ToLowerCase() that has a string parameter str, and returns the same string in lowercase.

Example 1:

1
2
Input: "Hello"
Output: "hello"

Example 2:

1
2
Input: "here"
Output: "here"

Example 3:

1
2
Input: "LOVELY"
Output: "lovely"
  • solution
1
2
3
4
5
6
7
8
9
class Solution(object):
def toLowerCase(self, str):
"""
:type str: str
:rtype: str
"""
result = str.lower()

return result

#20180720_595 Big Countries

  • question

There is a table World

1
2
3
4
5
6
7
8
9
+-----------------+------------+------------+--------------+---------------+
| name | continent | area | population | gdp |
+-----------------+------------+------------+--------------+---------------+
| Afghanistan | Asia | 652230 | 25500100 | 20343000 |
| Albania | Europe | 28748 | 2831741 | 12960000 |
| Algeria | Africa | 2381741 | 37100000 | 188681000 |
| Andorra | Europe | 468 | 78115 | 3712000 |
| Angola | Africa | 1246700 | 20609294 | 100990000 |
+-----------------+------------+------------+--------------+---------------+

A country is big if it has an area of bigger than 3 million square km or a population of more than 25 million.

Write a SQL solution to output big countries’ name, population and area.

For example, according to the above table, we should output:

1
2
3
4
5
6
+--------------+-------------+--------------+
| name | population | area |
+--------------+-------------+--------------+
| Afghanistan | 25500100 | 652230 |
| Algeria | 37100000 | 2381741 |
+--------------+-------------+--------------+
  • solution
1
2
3
4
# Write your MySQL query statement below
select name,population,area
from World
where population > 25000000 or area > 3000000

#20180721_804 Unique Morse Code Words

  • question

International Morse Code defines a standard encoding where each letter is mapped to a series of dots and dashes, as follows: “a” maps to “.-“, “b” maps to “-…”, “c” maps to “-.-.”, and so on.

For convenience, the full table for the 26 letters of the English alphabet is given below:

1
[".-","-...","-.-.","-..",".","..-.","--.","....","..",".---","-.-",".-..","--","-.","---",".--.","--.-",".-.","...","-","..-","...-",".--","-..-","-.--","--.."]

Now, given a list of words, each word can be written as a concatenation of the Morse code of each letter. For example, “cab” can be written as “-.-.-….-“, (which is the concatenation “-.-.” + “-…” + “.-“). We’ll call such a concatenation, the transformation of a word.

Return the number of different transformations among all words we have.

1
2
3
4
5
6
7
8
9
Example:
Input: words = ["gin", "zen", "gig", "msg"]
Output: 2
Explanation:
The transformation of each word is:
"gin" -> "--...-."
"zen" -> "--...-."
"gig" -> "--...--."
"msg" -> "--...--."

There are 2 different transformations, “–…-.” and “–…–.”.

Note:

1
2
3
1. The length of words will be at most 100.
2. Each words[i] will have length in range [1, 12].
3. words[i] will only consist of lowercase letters.
  • solution
1
2
3
4
5
6
7
8
9
10
11
12
13
14
15
16
17
18
19
20
21
22
23
24
25
26
class Solution(object):
def uniqueMorseRepresentations(self, words):
"""
:type words: List[str]
:rtype: int
"""
morse_code_dict = {"a": ".-", "b": "-...", "c": "-.-.", \
"d": "-..", "e": ".", "f": "..-.", \
"g": "--.", "h": "....", "i": "..", \
"j": ".---", "k": "-.-", "l": ".-..", \
"m": "--", "n": "-.", "o": "---", \
"p": ".--.", "q": "--.-", "r": ".-.", \
"s": "...", "t": "-", "u": "..-", \
"v": "...-", "w": ".--", "x": "-..-", \
"y": "-.--", "z": "--.."}
morse_words = []
count = 0
for word in words:
morse_word = ''
for item in word:
morse_word = morse_word + morse_code_dict[item]

if morse_word not in morse_words:
count = count + 1
morse_words.append(morse_word)
return count

#20180722_461 Hamming Distance

  • question

The Hamming distance between two integers is the number of positions at which the corresponding bits are different.

Given two integers x and y, calculate the Hamming distance.

Note:
0 ≤ x, y < 231.

Example:

1
2
3
4
5
6
7
8
Input: x = 1, y = 4

Output: 2

Explanation:
1 (0 0 0 1)
4 (0 1 0 0)
↑ ↑

The above arrows point to positions where the corresponding bits are different.

  • solution
1
2
3
4
5
6
7
8
9
10
11
12
13
class Solution(object):
def hammingDistance(self, x, y):
"""
:type x: int
:type y: int
:rtype: int
"""
count = 0
diff = x^y
while diff > 0:
count += diff & 1
diff >>= 1
return count

redhat实习总结

在实习过程中见识到了很多我特别感兴趣的项目,但是苦于自己底子薄弱,无法深入研究。

#dpdk+kvm-rt+kernel-rt+openvswitch

这套方案是 Red Hat 的主推的NFV(Network Functions Virtualization)技术标准。
其中 dpdk 主要解决传统 linux 网络协议栈中数据包的传输要经过内核态和用户态的拷贝开销。dpdk的做法是将数据包传输全部放在用户态进行。由Intel提出并开源。主要基于Intel的网卡。

kvm-rt 和 kernel-rt 主要解决迅速判断问题,它能过迅速给出判断结果,并不是速度快。

openvswitch 主要解决SDN的需求,相对于传统的linux bridge,ovs可定制化程度更高。

#Question

开源软件,如 qemu-kvm 为什么要实现这么多功能。
为了降低数据包处理的延迟,将数据包从linux协议栈转移到内核态。安全性如何保障?

数据结构学习笔记

#排序算法

排序算法总的来说有 *O(n2)** 和 *O(nlogn)*时间复杂度的两种解法。
**O(n
2)*的代表:
- 选择排序
- 插入排序
**O(n
logn)**的代表:
- 归并排序
- 快速排序

#选择排序

时间复杂度为*O(n2)**,编码简单,易于实现。
从未排好序的元素中选出最小的元素加入到排好序的末尾。
简单实现:

1
2
3
4
5
6
7
8
9
10
11
template<typename T>
void selectionSort(T arr[], int n){
for(int i = 0 ; i < n ; i ++){
// 保存当前要选出的最小元素的位置
int minIndex = i;
for( int j = i + 1 ; j < n ; j ++ )
if( arr[j] < arr[minIndex] )
minIndex = j;
swap( arr[i] , arr[minIndex] );
}
}

#插入排序

其中写法1和写法2相同。写法3的区别是使用赋值操作代替交换操作。
插入排序相对与选择排序的优点是可以提前结束内层循环,但是如果在数据量很大时,swap操作会消耗大量时间。
切记内层循环中不要使用swap。
即可以使用方法3进行优化。

1
2
3
4
5
6
7
8
9
10
11
12
13
14
15
16
17
18
19
20
21
22
23
24
25
26
27
28
29
30
31
32
33
34
35
36
37
38
39
40
41
42
43
44
45
46
47
48
49
50
51
52
53
54
55
56
57
58
59
60
61
62
63
64
65
66
67
68
69
70
71
72
73
template<typename T>
void insertionSort(T arr[], int n){

for( int i = 1 ; i < n ; i ++ ) {

// 寻找元素arr[i]合适的插入位置
// 写法1
for( int j = i ; j > 0 ; j-- )
if( arr[j] < arr[j-1] )
swap( arr[j] , arr[j-1] );
else
break;

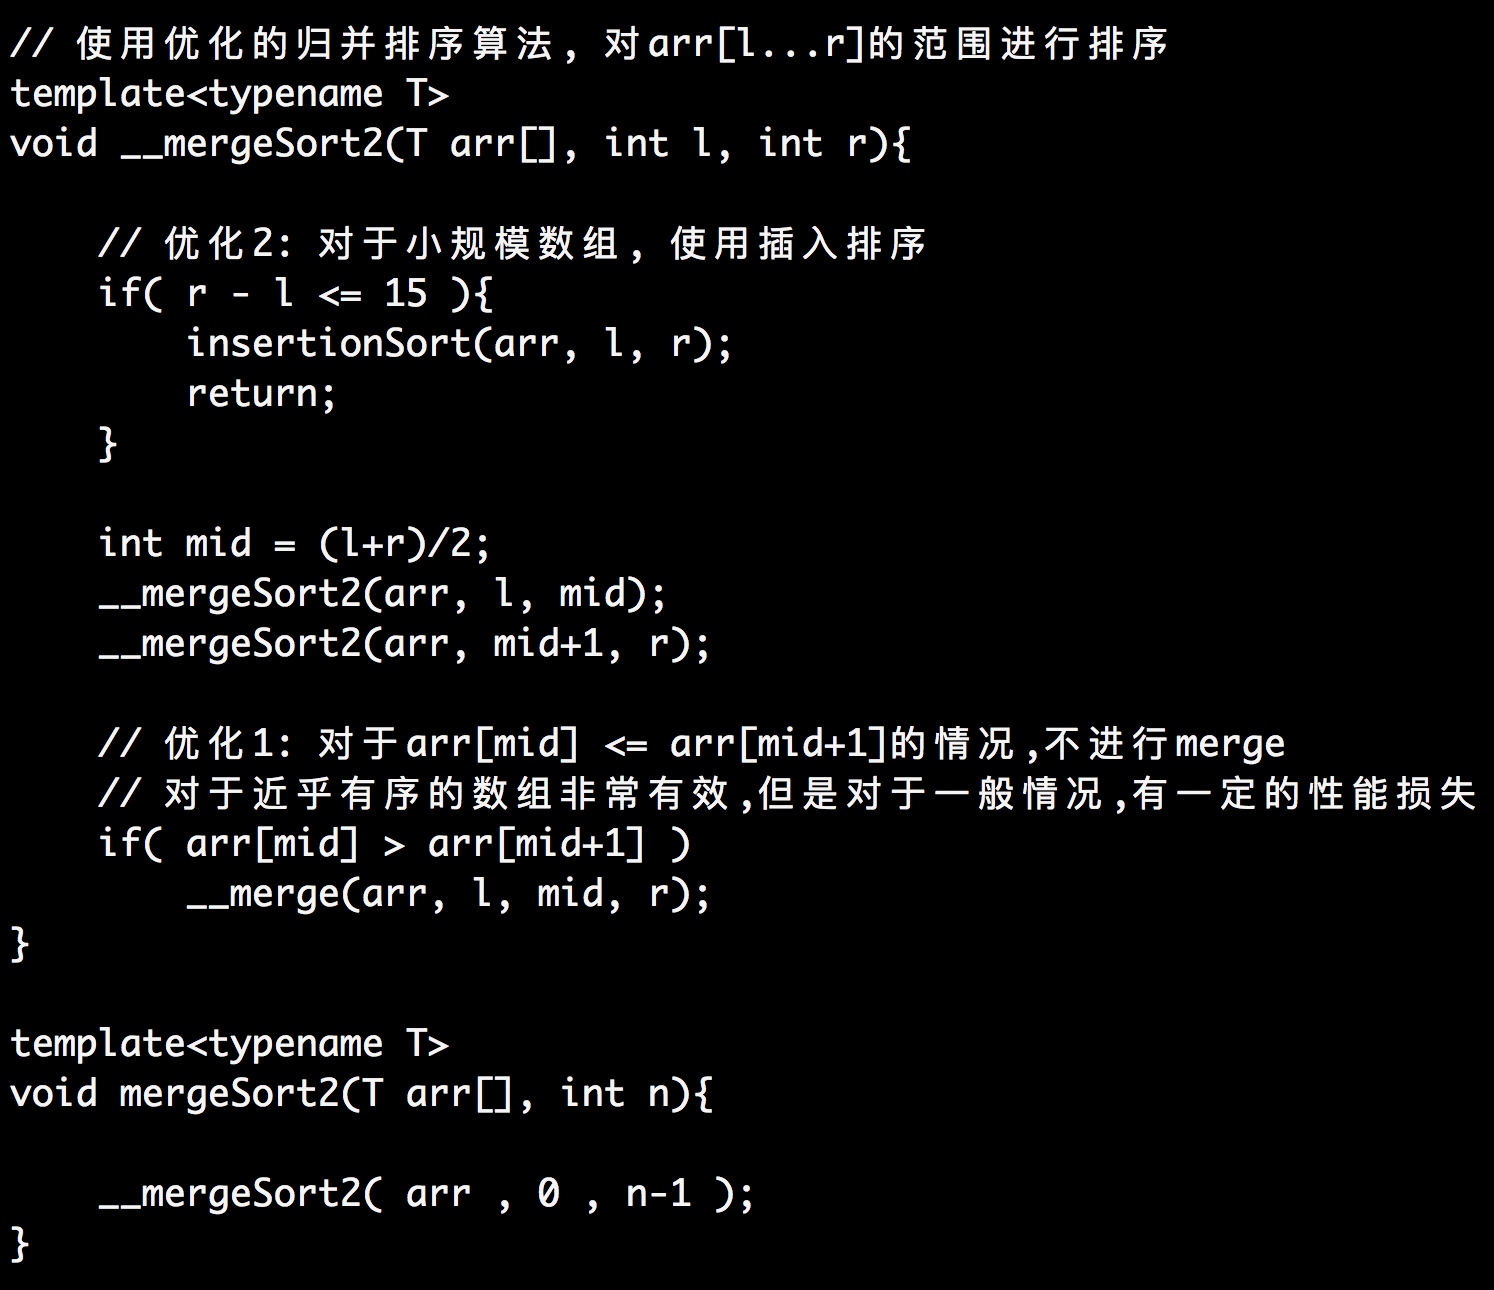
// 写法2
for( int j = i ; j > 0 && arr[j] < arr[j-1] ; j -- )
swap( arr[j] , arr[j-1] );

// 写法3
T e = arr[i];
int j; // j保存元素e应该插入的位置
for (j = i; j > 0 && arr[j-1] > e; j--)
arr[j] = arr[j-1];
arr[j] = e;
}

return;
}
int main() {

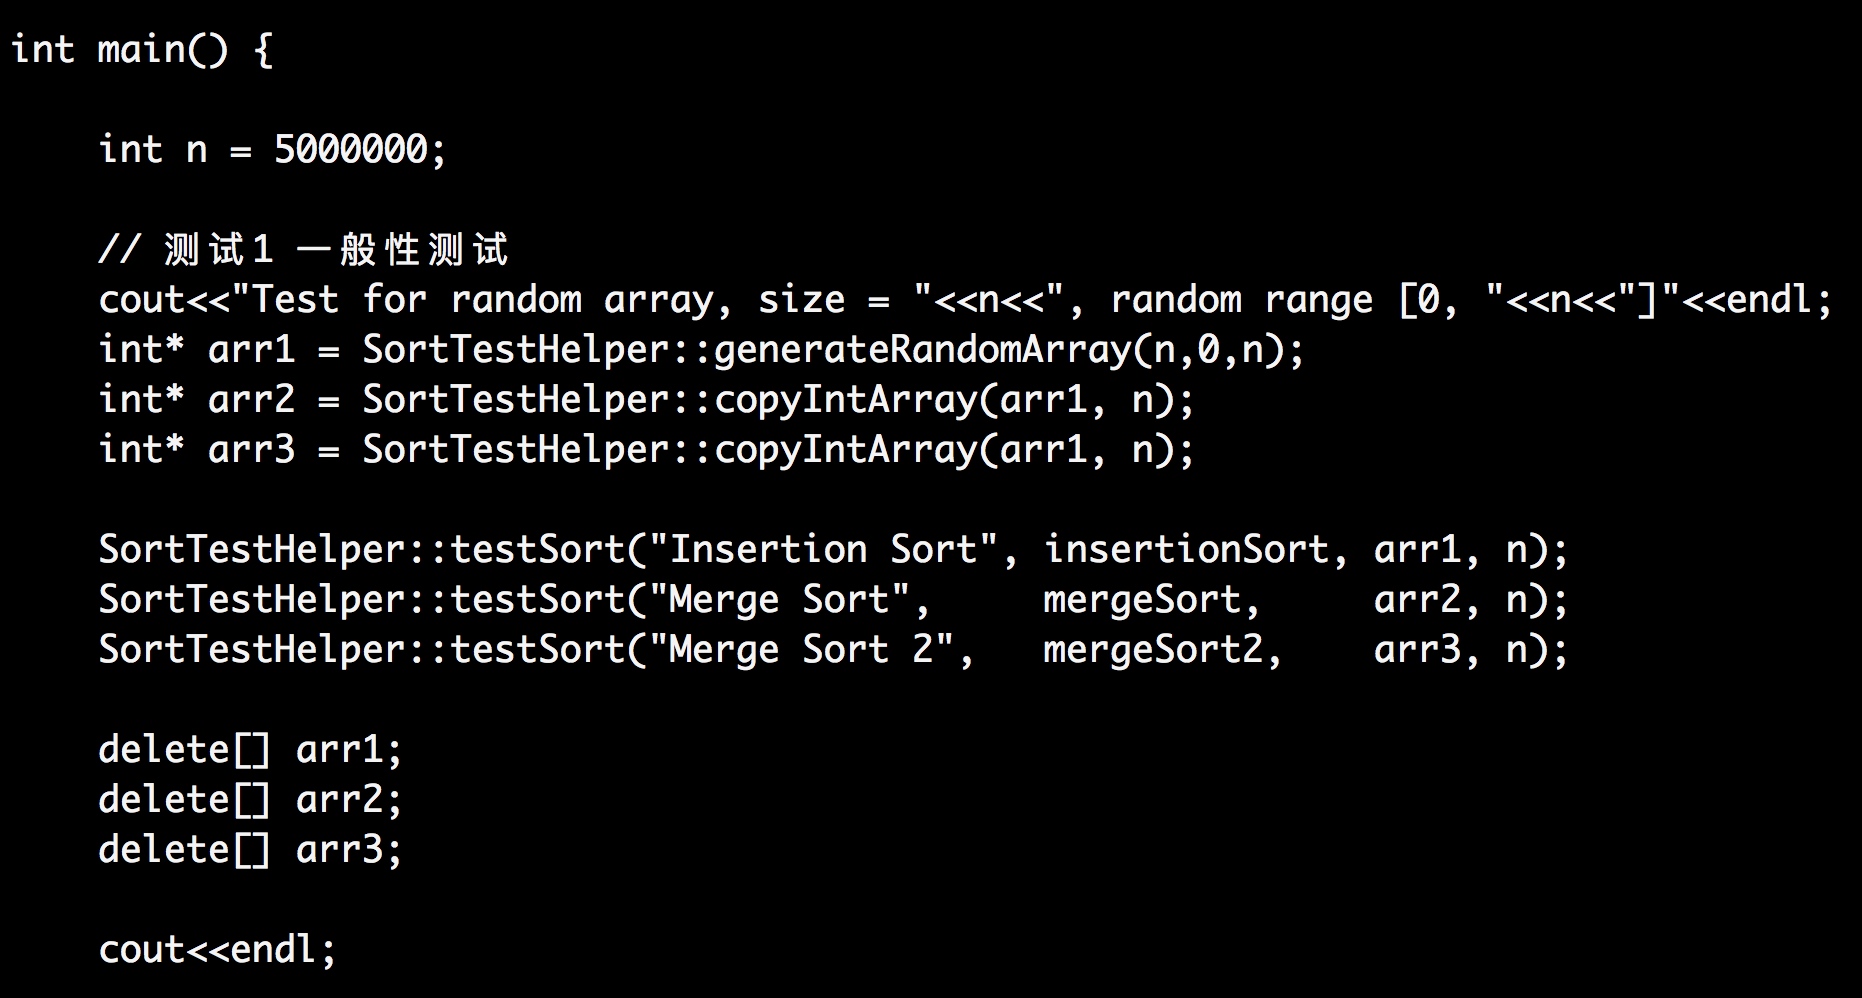
int n = 20000;

// 测试1 一般测试
cout<<"Test for random array,size = "<<n<<", random range [0, "<<n<<"]"<<endl;
int *arr1 = SortTestHelper::generateRandomArray(n,0,n);
int *arr2 = SortTestHelper::copyIntArray(arr1, n);

SortTestHelper::testSort("Insertion Sort", insertionSort,arr1,n);
SortTestHelper::testSort("Selection Sort", selectionSort,arr2,n);

delete[] arr1;
delete[] arr2;

cout<<endl;


// 测试2 有序性更强的测试
cout<<"Test for more ordered random array, size = "<<n<<", random range [0, 3]"<<endl;
arr1 = SortTestHelper::generateRandomArray(n,0,3);
arr2 = SortTestHelper::copyIntArray(arr1, n);

SortTestHelper::testSort("Insertion Sort", insertionSort,arr1,n);
SortTestHelper::testSort("Selection Sort", selectionSort,arr2,n);

delete[] arr1;
delete[] arr2;

cout<<endl;


// 测试3 测试近乎有序的数组
int swapTimes = 100;
cout<<"Test for nearly ordered array, size = "<<n<<", swap time = "<<swapTimes<<endl;
arr1 = SortTestHelper::generateNearlyOrderedArray(n,swapTimes);
arr2 = SortTestHelper::copyIntArray(arr1, n);

SortTestHelper::testSort("Insertion Sort", insertionSort,arr1,n);
SortTestHelper::testSort("Selection Sort", selectionSort,arr2,n);

delete[] arr1;
delete[] arr2;

return 0;
}
1
2
3
4
5
6
7
8
9
10
11
12
//内层循环使用赋值
Test for random array, size = 20000, random range [0, 20000]
Insertion Sort : 0.265907 s
Selection Sort : 0.411309 s

Test for more ordered random array, size = 20000, random range [0, 3]
Insertion Sort : 0.197426 s
Selection Sort : 0.43127 s

Test for nearly ordered array, size = 20000, swap time = 100
Insertion Sort : 0.004048 s
Selection Sort : 0.417837 s
1
2
3
4
5
6
7
8
9
10
11
12
//内层循环使用swap
Test for random array, size = 20000, random range [0, 20000]
Insertion Sort : 0.557159 s
Selection Sort : 0.414171 s

Test for more ordered random array, size = 20000, random range [0, 3]
Insertion Sort : 0.412834 s
Selection Sort : 0.430294 s

Test for nearly ordered array, size = 20000, swap time = 100
Insertion Sort : 0.008028 s
Selection Sort : 0.432235 s

可以看到即使有提前结束循环的加成,但是由于swap操作相当于3次赋值操作,即导致插入排序相对于选择排序并不存在优势。

#归并排序

归并排序的思想是首先将左边的数据和右边的数据分别排序,然后进行归并,在两边的数据进行排序的过程和这个过程一样分为两个部分然后进行排序和归并。这是一个递归的过程。归并的操作时选出两个部分小的加入到排好序的序列中。

1
2
3
4
5
6
7
8
9
10
11
12
13
14
15
16
17
18
19
20
21
22
23
24
25
26
27
28
29
30
31
32
33
34
35
36
37
38
39
40
41
42
43
template<typename  T>
void __merge(T arr[], int l, int mid, int r){


T *aux = new T[r-l+1];
int i = l, j = mid+1;
for( int k = l ; k <= r; k ++ ){

if( i > mid ){ // 如果左半部分元素已经全部处理完毕
arr[k] = aux[j-l]; j ++;
}
else if( j > r ){ // 如果右半部分元素已经全部处理完毕
arr[k] = aux[i-l]; i ++;
}
else if( aux[i-l] < aux[j-l] ) { // 左半部分所指元素 < 右半部分所指元素
arr[k] = aux[i-l]; i ++;
}
else{ // 左半部分所指元素 >= 右半部分所指元素
arr[k] = aux[j-l]; j ++;
}
}
delete[] aux;
}

// 递归使用归并排序,对arr[l...r]的范围进行排序
template<typename T>
void __mergeSort(T arr[], int l, int r){
// 处理递归到底的情况
if( l >= r )
return;
// 否则进行一次归并排序
int mid = (l+r)/2;
__mergeSort(arr, l, mid);
__mergeSort(arr, mid+1, r);
__merge(arr, l, mid, r);
}

template<typename T>
void mergeSort(T arr[], int n){

__mergeSort( arr , 0 , n-1 );
}

1
2
3
4
5
6
7
8
//测试结果
Test for random array, size = 100000, random range [0, 100000]
Insertion Sort : 6.43724 s
Merge Sort : 0.031772 s

Test for nearly ordered array, size = 100000, swap time = 10
Insertion Sort : 0.002678 s
Merge Sort : 0.024516 s

#优化方法

  1. 判断arr[mid]和arr[mid]的大小,当arr[mid]<arr[mid+1]说明已经有序,不必进行merge。
    1
    2
    3
    4
    __mergeSort(arr, l, mid);
    __mergeSort(arr, mid+1, r);
    if(arr[mid]>arr[mid+1])
    __merge(arr, l, mid, r);
  2. 当有巨量数据时,不将数组分割成很小的部分,例如当数据近乎有序时,插入排序的时间复杂度会降低到O(n),可利用这一特点进行优化。
    1
    2
    3
    4
    if( r-l<=16 ){
    insertionSort(arr,l,r);
    return;
    }
    1
    2
    3
    4
    5
    6
    7
    8
    // 使用1和2进行优化的结果
    Test for random array, size = 100000, random range [0, 100000]
    Insertion Sort : 6.94346 s
    Merge Sort : 0.020683 s

    Test for nearly ordered array, size = 100000, swap time = 10
    Insertion Sort : 0.003424 s
    Merge Sort : 0.00362 s

    #快速排序

#堆排序

#辅助函数

辅助函数用于生成随机序列和检测排序结果。

1
2
3
4
5
6
7
8
9
10
11
12
13
14
15
16
17
18
19
20
21
22
23
24
25
26
27
28
29
30
31
32
33
34
35
36
37
38
39
40
41
42
43
44
45
46
47
48
49
50
51
52
53
54
55
56
57
58
59
60
61
62
63
64
65
66
67
68
69
70
71
72
73
74
75
76
77
78
79
80
81
82
83
84
85
86
87
88
89
90
#include <iostream>
#include <algorithm>
#include <string>
#include <ctime>
#include <cassert>
#include <string>

using namespace std;


namespace SortTestHelper {

// 生成有n个元素的随机数组,每个元素的随机范围为[rangeL, rangeR]
int *generateRandomArray(int n, int range_l, int range_r) {

int *arr = new int[n];

srand(time(NULL));
for (int i = 0; i < n; i++)
arr[i] = rand() % (range_r - range_l + 1) + range_l;
return arr;
}

// 生成一个近乎有序的数组
// 首先生成一个含有[0...n-1]的完全有序数组, 之后随机交换swapTimes对数据
// swapTimes定义了数组的无序程度:
// swapTimes == 0 时, 数组完全有序
// swapTimes 越大, 数组越趋向于无序
int *generateNearlyOrderedArray(int n, int swapTimes){

int *arr = new int[n];
for(int i = 0 ; i < n ; i ++ )
arr[i] = i;

srand(time(NULL));
for( int i = 0 ; i < swapTimes ; i ++ ){
int posx = rand()%n;
int posy = rand()%n;
swap( arr[posx] , arr[posy] );
}

return arr;
}

// 拷贝整型数组a中的所有元素到一个新的数组, 并返回新的数组
int *copyIntArray(int a[], int n){

int *arr = new int[n];
//* 在VS中, copy函数被认为是不安全的, 请大家手动写一遍for循环:)
copy(a, a+n, arr);
return arr;
}

// 打印arr数组的所有内容
template<typename T>
void printArray(T arr[], int n) {

for (int i = 0; i < n; i++)
cout << arr[i] << " ";
cout << endl;

return;
}

// 判断arr数组是否有序
template<typename T>
bool isSorted(T arr[], int n) {

for (int i = 0; i < n - 1; i++)
if (arr[i] > arr[i + 1])
return false;

return true;
}

// 测试sort排序算法排序arr数组所得到结果的正确性和算法运行时间
template<typename T>
void testSort(const string &sortName, void (*sort)(T[], int), T arr[], int n) {

clock_t startTime = clock();
sort(arr, n);
clock_t endTime = clock();
cout << sortName << " : " << double(endTime - startTime) / CLOCKS_PER_SEC << " s"<<endl;

assert(isSorted(arr, n));

return;
}

};

#查找算法

#二分查找法

  • 时间复杂度O(log(n))
  • 输入的数据必须有序
1
2
3
4
5
6
7
8
9
10
11
12
13
14
15
16
17
18
19
20
21
22
23
24
25
26
27
28
29
30
31
32
template<typename T>
int binarySearch(T arr[], int n, T target){

// 在arr[l...r]之中查找target
int l = 0, r = n-1;
while(l <= r){
//int mid = (l+r)/2;//这里有溢出的可能
int mid = l + (r-l)/2;
if(arr[mid] == target)
return mid;
if(arr[mid]< target)
l = mid + 1;
else
r = mid - 1;
}
// while( l <= r ){
//
// //int mid = (l + r)/2;
// // 防止极端情况下的整形溢出,使用下面的逻辑求出mid
// int mid = l + (r-l)/2;
//
// if( arr[mid] == target )
// return mid;
//
// if( arr[mid] > target )
// r = mid - 1;
// else
// l = mid + 1;
// }

return -1;
}

The Other Side of Hope

#The Other Side of Hope

#怎么找到这部电影的

大家都在看权利的游戏,我没看过,好像自己丢失了许多兴趣。

但是我想看点东西,缓解压抑的心情。

所以在学校BT上乱翻,看吸引我的标题,就翻到了这部电影

#电影信息

资源名称:Toivon tuolla puolen(希望的另一面, The Other Side of Hope)
主要演员:韦勒·维坦恩,卡蒂·奥廷宁,汤米·柯贝拉,什万·哈吉
电影类型:剧情,喜剧
产  地:芬兰,德国
导  演:阿基·考里斯马基
发布时间:2017
豆瓣评分:8
豆瓣链接:https://movie.douban.com/subject/26678509/
简介:描述叙利亚难民为寻找避难之处来到芬兰赫尔辛基,与当地人结识的过程。

#电影剧情

里面有两个男人,一个是叙利亚难民 ,一个是芬兰商人。

叙利亚难民,一路从他的祖国逃难到芬兰,走路穿越国境,通过蛇头偷渡,最后在运煤轮船的煤堆里到达芬兰。
下船后去火车站洗掉了身上的煤渣。找当地的警察局办理避难。最后在一个救助中心落脚。

叙利亚难民有个妹妹在偷渡过程中走散了。他非常想找到他的妹妹,一直没在一个国家停留。丧失了信仰。在各个国家东躲西藏。
受尽欺凌。

芬兰商人是做衬衣生意的,夫妻感情走到尽头。他净身出户,找以前的商业伙伴以半价卖出了库存的所有衬衣。
然后去赌场,在最后一场和对手all in ,赢了对手,去租下了一个餐馆。芬兰的餐馆居然可以直接上罐头。

叙利亚难民一直在尝试找他的妹妹。

他的避难申请没有通过,当局会将他遣返。

遣返的前一天,他在新闻上看见叙利亚的还是一片战乱。

第二天一早,警察局的人来了,救护中心的护士好心帮他让他逃跑了。

这样他在芬兰就是黑户了,没有正式身份,但是好歹在这留下来了。

芬兰商人的餐馆员工在后厨养了一条狗叫科斯塔恩,商人要把它扔出去,最迟留到明天早上。

两个人的交集在这时产生了。

难民睡在商人餐馆的垃圾堆里,两人产生了争执,互相揍了一拳,难民倒下了。
后来商人请他在店里做工,并且把自己的以前衬衣仓库给他住下了,本来是让他住餐馆停运的冷库。

这部电影有德国的古板味道。

警察来餐馆检查卫生和消防。以检查不合格,命令整改。

老板找黑客给难民制作了假身份。一千块钱。假身份在警察那可用。

老板找员工出主意商量改善经营,提议做日本寿司。

老板在书店买了几本东方的书籍就开始做了。很认真的做寿司。

店员的态度很严谨,但是材料准备不足,把鲱鱼拿了出来。对,就是那个鲱鱼罐头,客人当然都走了。

还是改回了买肉丸。加上了乐队和跳舞。

芬兰的生活可能是难民的hope,但是商人的hope在哪。

叙利亚难民的伊拉克朋友告诉他,他的妹妹找到了,在立陶宛的难民中心。

老板多了个心眼,找到货轮的船长让他带消息去立陶宛,并且帮他把妹妹带回了芬兰。

故事到这里就快要结束了。

难民想要他的妹妹和他一样伪造身份在芬兰留下来。但是她不答应。他找救护中心帮过他的护士将他的妹妹带到警察局。

之前找过他麻烦的地痞,在他住所的门前捅了他一刀。

商人回来找他的妻子,重归于好。

在回到家里的时候,看到难民住的仓库里没人,并且地上有血迹。

难民叫哈立德。最后和那个叫科斯塔恩的狗生活在一起。

他们的Hope都在一步步的实现,虽然有磨难。

#感想

没什么感想。

只是想转移下自己的注意力,所以一边看电影,一边写下了这些。

慢慢来。

SIMTRACE环境搭建

工具环境搭建。仅作参考,具有时效性,请以官方文档为准。

#跨平台编译工具arm-elf

参考链接:https://osmocom.org/projects/baseband/wiki/GnuArmToolchain
新建三个目录
$mkdir build src install

安装依赖
$ sudo apt-get install build-essential libgmp3-dev libmpfr-dev libx11-6 libx11-dev texinfo flex bison libncurses5 libncurses5-dbg libncurses5-dev libncursesw5 libncursesw5-dbg libncursesw5-dev zlibc zlib1g-dev libmpfr4 libmpc-dev

将文件夹中
binutils-2.21.1a.tar.bz2,gcc-4.5.2.tar.bz2,newlib-1.19.0.tar.gz放在src
脚本工具gnu-arm-build.2.sh 放在当前目录,执行 gnu-arm-build.2.sh
$ bash gnu-arm-build.2.sh
目录结构如下:

报错处理:
先卸载 texinfo
$apt remove texinfo
安装低版本texinfo
dpkg –i texinfo_4.13a.dfsg.1-8ubuntu2_amd64.deb
再运行
$ ./gnu-arm-build.2.sh

#编译库文件libosmocore

参考链接

https://osmocom.org/projects/libosmocore/wiki/Libosmocore

安装依赖

$ sudo apt-get install build-essential libtool libtalloc-dev shtool autoconf automake git-core pkg-config make gcc libpcsclite-dev

1
2
3
4
5
6
7
8
$ git clone git://git.osmocom.org/libosmocore.git
$ cd libosmocore/
$ autoreconf -i
$ ./configure
$ make
$ sudo make install
$ sudo ldconfig -i
$ cd ..

#安装pc客户端simtrace

参考链接

https://osmocom.org/projects/simtrace/wiki/SIMtrace

下载simtrace源码
$ git clone git://git.osmocom.org/simtrace.git
依赖
$ sudo apt-get install libusb-1.0-0-dev

$ cd simtrace/host
编译
$ make

#编译simtrace 固件

参考链接

https://osmocom.org/projects/simtrace/wiki/SIMtrace_Firmware

#下载源码及编译

osmocom最新修改的openpcd源码无法正常使用,其头文件中结构体变量声明类型有误,或者是交叉编译工具版本较旧(uint8_t/ u_int8_t 两个定义),使用旧的可编译通过的源码,openpcd.zip
源码修改链接

http://git.osmocom.org/openpcd/commit/?id=373c172ab858102e1818c8476ab1a2b290685cda

在交叉编译工具中的头文件( #include < sys/types.h > )

源代码中最近一次修改是将所有文件中的数据类型u_int8_t、u_int16_t全部修改为uint8_t、uint16_t,但是使用的交叉编译工具(arm-elf-gcc)中的对该数据类型的定义为u_int8_t、u_int16_t。这导致新代码编译出错。

$ git clone git://git.osmocom.org/openpcd.git
$ cd openpcd/firmware
设置环境变量(arm-elf-gcc所在目录)
$ export PATH=$PATH:/home/mtq/simtrace/arm-elf-toolchain/install/bin
$ make -f Makefile.dfu BOARD=SIMTRACE
$ make BOARD=SIMTRACE DEBUG=1 TARGET=main_simtrace
$ cat dfu.bin main_simtrace.bin > main_simtrace.samba
$ cd ../..
其中生成的文件


dfu.bin – the sam7dfu 2nd level bootloader. It implements the USB DFU (Device Firmware Upgrade) profile.
main_simtrace.bin – the actual simtrace program. To be loaded via DFU, using dfu-util.
main_simtrace.samba – sam7dfu + simtrace image. to be loaded via SAM-BA, using sam7utils (see below).


#两种给板子刷固件的方法

#DFU模式

该模式是在固件可用下,需要升级固件时使用
安装工具
$ sudo apt-get install dfu-util
刷固件
$ sudo dfu-util -d 16c0:0762 -a0 -D ./main_simtrace.bin –R

#SAM-BA

该模式用于板子固件丢失,需要重新刷入底层固件
$ wget http://www.openpcd.org/dl/sam7utils-0.2.1-bm.tar.bz2
(该链接已经失效)
$ tar xf sam7utils-*.tar.bz2
$ cd sam7utils
$ ./configure --prefix=/usr/local
$ make AM_CFLAGS=""
编译生成工具
将板子进入SAM-BA模式